
How to Migrate from a Flat Network to a 3-Tier Architecture
As businesses grow, flat networks quickly become hard to manage, scale, and troubleshoot. A 3-tier architecture solves this by dividing the network into three layers, each with a clear role, so traffic is easier to control, secure, and expand.
A flat network may work well for small environments, but it can quickly lead to broadcast congestion, weak segmentation, and poor scalability. By migrating to a 3-tier design, organizations can improve performance, simplify management, and create a network that is ready for future growth.
What Is a 3-Tier Network?
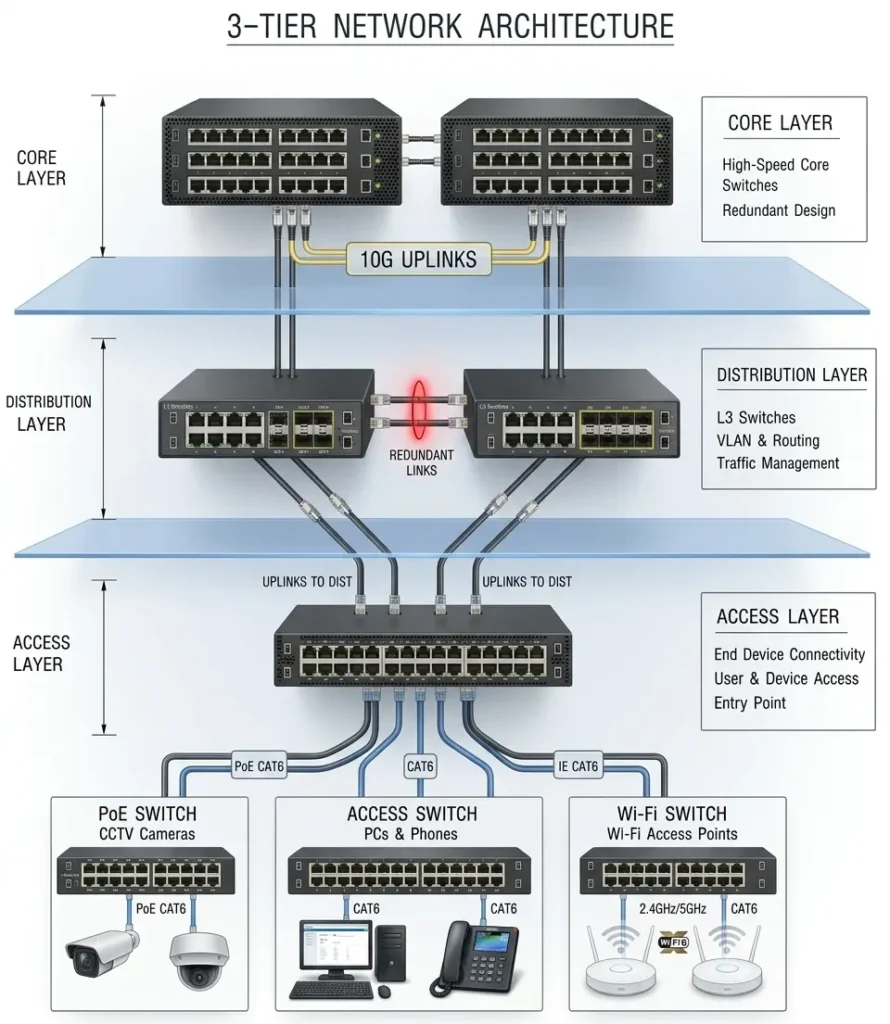
The 3-tier model organizes your network into:
- Access Layer – Connects end devices like PCs, phones, printers, cameras, and Wi-Fi access points.
- Distribution Layer – Aggregates access switches, handles inter-VLAN routing, and applies policies like ACLs.
- Core Layer – Provides fast, redundant backbone connectivity between distribution blocks and major network segments.
This structure separates responsibilities and makes the network easier to expand and maintain. For businesses in Dubai looking to implement this design, Cisco switches and routers provide industry-leading performance and reliability.
Why Move Away from a Flat Network?
Flat networks work fine for small setups, but they create real problems as you grow:
- Large broadcast domains that slow everything down
- Weak traffic segmentation and poor isolation
- Difficult troubleshooting when something goes wrong
- Limited scalability as devices and users increase
- Poor control over traffic flow and security policies
A 3-tier architecture fixes all of this by giving each layer a specific job. In contrast, it introduces clear segmentation and hierarchy, which leads to better control and more predictable performance. For businesses in Dubai, working with an experienced IT support company in Dubai can make this transition much smoother
Migration Approach
The best way to migrate is in phases rather than all at once. A gradual transition reduces risk, keeps the network stable, and helps avoid major outages. First build the new core and distribution layers, then move users and devices into the access layer gradually. This approach lets you keep the old and new environments connected temporarily while you transition site by site or department by department.
Migration Plan: Step by Step
Step 1: Assess the current network
Document all switches, VLANs, IP ranges, uplinks, and connected devices. Identify critical services like DHCP, DNS, servers, cameras, phones, and Wi-Fi. This gives you a clear baseline before touching anything. A careful plan also helps you decide whether routing will sit at the distribution layer and whether you need dynamic routing or static routes.
Step 2: Design the target architecture
Decide which switches will act as core, distribution, and access. Define VLANs, subnets, routing boundaries, redundancy paths, and uplink speeds. Plan DHCP relay, default gateways, and ACLs before moving any traffic. Build a clean subnet plan for users, voice, Wi‑Fi, CCTV, servers, and management. Keep each major function in its own VLAN.
Step 3: Build the core layer first
Deploy a pair of high-speed, redundant core switches. Keep this layer lean and focused only on fast forwarding between network sections. Avoid hosting access ports or policy logic here.
Step 4: Add the distribution layer
Place Layer 3 switches between the core and access layers. Configure inter-VLAN routing, gateway placement, ACLs, and redundancy here. This is where most of your policy control should live.
Step 5: Rebuild the access layer
Connect end devices to access switches in a logical order. Group users, printers, cameras, phones, and Wi-Fi access points into the right VLANs before migrating. Keep user ports, printers, APs, cameras, and phones grouped logically.
Step 6: Migrate one group at a time
Start with a low-risk area like one floor, one department, or a pilot group. After each move, verify connectivity, DHCP, DNS, printing, Wi-Fi, and application access before continuing.
Step 7: Test routing and failover
Confirm traffic moves correctly between VLANs and across the core. Test uplink redundancy, gateway failover, and any dynamic routing or static route configuration you introduced.
Step 8: Monitor and tune
Watch latency, broadcast traffic, errors, and link utilization after each cutover. Rebalance uplinks or refine routing and ACL rules as needed. If needed, adjust VLAN placement to improve stability.
Recommended Migration Order
A practical migration sequence is:
- Build the new core
- Add distribution and connect it to the old network
- Move infrastructure services like DHCP, DNS, and domain controllers
- Migrate Wi-Fi and low-risk users
- Move printers, cameras, phones, and remaining departments
- Decommission the old flat segments once everything is verified
This order minimizes risk because critical services are handled early and user devices are moved only after the new design is proven stable.
Example Rollout for a Medium Office
| Week | Task |
|---|---|
| Week 1 | Assess and design |
| Week 2 | Install core and distribution switches |
| Week 3 | Build VLANs and test routing |
| Week 4 | Migrate Wi-Fi and a small user group |
| Week 5 | Move printers, cameras, and phones |
| Week 6 | Migrate remaining departments and decommission flat network |
Best Practices
- Keep the core layer lean, fast, and fully redundant
- Use the distribution layer for routing, policy control, and aggregation
- Separate every device type into its own VLAN
- Document every VLAN, subnet, trunk, and uplink clearly
- Test thoroughly after each phase before moving on
- Always have a rollback plan ready for each cutover
- Maintain rollback plans for each cutover (redundant but worth emphasizing)
Common Mistakes to Avoid
- Moving too many users at once, which makes troubleshooting a nightmare
- Forgetting to update gateways, DHCP relay, and DNS settings
- Overloading the core with services that belong at the distribution layer
- Skipping redundancy planning until something actually fails
- Not testing VoIP, CCTV, and wireless after each migration phase
- Forgetting DHCP relay, DNS settings, default gateways, ACLs, and monitoring tools during the transition (these are the details that usually cause hidden failures)
Final Takeaway
The safest way to migrate from a flat network to a 3-tier architecture is to build the new layers first, then shift traffic gradually in controlled phases. Plan your VLANs, routing, redundancy, and testing carefully, and the transition will be smooth, stable, and ready to scale.
For businesses in Dubai looking to implement or upgrade their network infrastructure, sourcing genuine Cisco switches and working with experienced engineers makes the process significantly easier. You can contact FSI Technology for expert guidance on network design, hardware supply, and implementation support across the UAE.
FAQ
If anything is still unclear about migrating from a flat network to a 3-tier architecture, leave your question in the comments and we’ll be happy to help.
A flat network is a network design where most devices are on the same Layer 2 segment or broadcast domain. It is simple to set up, but it becomes harder to manage as the number of users and devices grows.
| Layer | Role | Typical Devices |
|---|---|---|
| Access Layer | Connects end devices: PCs, phones, printers, cameras, Wi-Fi APs | Access switches, PoE switches |
| Distribution Layer | Aggregates access switches, handles inter-VLAN routing, applies ACLs | Layer 3 switches, firewalls |
| Core Layer | Fast, redundant backbone between distribution blocks and segments | High-speed core switches, routers |
No, the migration should be done in phases. A gradual rollout reduces risk, minimizes downtime, and makes it easier to test each stage before moving forward.
You should inventory the existing network, document VLANs, IP ranges, devices, and critical services. You should also design the new VLAN structure, routing plan, and redundancy before making changes.
Critical infrastructure services such as DHCP, DNS, and directory services should be migrated early. After that, low-risk user groups, Wi‑Fi, and then other devices like printers and cameras can be moved.
The timeline depends on the size and complexity of the network. A small office may take a few weeks, while a larger environment may require several phases over a longer period.
It can be, but very small networks may not need full 3-tier separation. For growing businesses, however, it is often a better long-term design because it scales more cleanly.
The migration is complete when all users, devices, and services are operating correctly in the new architecture and the old flat network is no longer needed. At that point, the old configuration can be retired.
| # | Step | What to do |
|---|---|---|
| 1 | Assess Current Network | Document all switches, VLANs, IP ranges, uplinks, and connected devices. Identify critical services like DHCP, DNS, servers, cameras, phones, and Wi-Fi. |
| 2 | Design Target Architecture | Decide which switches will act as core, distribution, and access. Define VLANs, subnets, routing boundaries, redundancy paths, and uplink speeds. |
| 3 | Build the Core Layer | Deploy a pair of high-speed, redundant core switches. Keep this layer lean and focused only on fast forwarding between network sections. |
| 4 | Add Distribution Layer | Place Layer 3 switches between core and access. Configure inter-VLAN routing, gateway placement, ACLs, and redundancy here. |
| 5 | Rebuild Access Layer | Connect end devices to access switches in a logical order. Group users, printers, cameras, phones, and APs into the correct VLANs. |
| 6 | Migrate One Group at a Time | Start with a low-risk area. After each move, verify connectivity, DHCP, DNS, printing, Wi-Fi, and application access before continuing. |
| 7 | Test Routing and Failover | Confirm traffic moves correctly between VLANs and across the core. Test uplink redundancy, gateway failover, and routing configuration. |
| 8 | Monitor and Tune | Watch latency, broadcast traffic, errors, and link utilization. Rebalance uplinks or refine routing and ACL rules as needed. |